

Before you call anyone, check four things: the thermostat’s mode and batteries, the main breaker and outdoor disconnect, the air filter, and the condensate float switch. These four spots fix most no-start problems in under 10 minutes. Stop immediately and call a technician if the breaker trips twice, the outdoor unit hums without the fan spinning, or you smell anything burning.
TL;DR:
- Most no-start issues are caused by thermostat settings, dead batteries, tripped breakers, or a clogged condensate drain, which can be fixed in under 10 minutes.
- A non-responsive thermostat screen often results from weak batteries or loose wiring, not equipment failure, and replacing batteries can resolve the issue.
- Repeatedly resetting a tripped breaker or trying to force the system to restart can damage components and indicates the need for professional diagnosis.
- Symptoms like humming, clicking, or wobbly fan motion point to failed capacitors, contactors, or motors that require technician testing and replacement.
- Regular maintenance, including filter changes and annual tune-ups, prevents most of these no-start problems and reduces emergency service calls.
Table of Contents
- AC Not Turning On: Your Five-Minute Checklist
- Is Your Thermostat Actually Calling for Cooling?
- Checking the Breaker and Outdoor Disconnect Safely
- Filters, Frozen Coils, and Clogged Drains: The Airflow Culprits
- What Humming, Clicking, or a Dead Fan Really Means
- The Right Way to Reset Your System (and What Not to Do)
- When to Stop Troubleshooting and Call a Technician
- Preventing the Next No-Start Call
- Inspecting the Blower Motor and Fan
- Could a Sensor Be Blocking Startup?
- Technician Perspective: What We See on Most No-Start Calls
- Book a Diagnostic With Lucas Air and Skip the Guesswork
- Sources
AC Not Turning On: Your Five-Minute Checklist
Run these steps in order. Each one takes a minute or two, and each rules out a specific cause before you move to the next.
- Check the thermostat display (30 seconds). Confirm it’s set to “Cool” and the temperature is below room temperature. A blank screen usually means dead batteries or lost power.
- Swap the batteries (1 minute). Even thermostats that look “on” can fail to send a signal with weak batteries.
- Check the breaker panel (1 minute). Look for a breaker that’s flipped to the middle or opposite position from the others.
- Check the outdoor disconnect box (1 minute). Pull it and reseat it; a loose fuse or pulled disconnect stops the outdoor unit cold.
- Pull and inspect the air filter (1 minute). A filter caked in dust can trigger a safety shutoff on some systems.
If none of these restore power or airflow, or if you notice humming, clicking, or a tripped breaker that won’t hold, stop here. That’s your signal to move to the more detailed checks below, not to keep flipping switches. According to Carrier’s troubleshooting guidance, these same four areas, thermostat, breaker, disconnect, and float switch, are the standard first stops for a system that won’t start.
Is Your Thermostat Actually Calling for Cooling?
A surprising number of “broken AC” calls turn out to be thermostat settings, not equipment failures. If the screen is blank, dim, or unresponsive, you’re dealing with either dead batteries or a power interruption to the thermostat itself.
Work through this before assuming the outdoor unit is the problem:
- Confirm the system switch reads “Cool,” not “Off” or “Heat.”
- Confirm the fan is set to “Auto,” not “On” (a fan stuck on doesn’t mean cooling is running).
- Replace batteries even if the display looks fine. Weak batteries can power a screen but fail to send the call-for-cooling signal.
- If the thermostat is hardwired with no batteries, check whether it lost power along with the rest of the house or just the low-voltage circuit.
- Look for a small red or black wire that’s come loose from its terminal on the back of the thermostat. A loose connection here can silently kill the whole system.
If you’re comfortable with basic electrical work, some smart thermostats let you test the “R” and “Y” wires with a simple jumper to confirm the low-voltage circuit is intact. If you’re not confident doing that, skip it. This is where DIY troubleshooting should stop for most homeowners.
Pro Tip: Write the thermostat model number down before you call for service. Techs can often tell you over the phone whether a blank screen is a battery issue or a bigger problem, and it saves a truck roll.
Checking the Breaker and Outdoor Disconnect Safely
A tripped breaker is the single most common reason an outside AC unit not running gets reported as “the whole system is dead.” Here’s how to check it without making things worse.
Find your main electrical panel and locate the breaker labeled for the AC or condenser. It will usually sit in a position clearly different from the breakers around it, either flipped to the opposite direction or stuck in the middle. To reset it, push the breaker firmly to the full “Off” position first, then switch it to “On.” Simply nudging a tripped breaker back toward “On” without fully clearing it first often doesn’t reset the internal mechanism.
Next, check the outdoor disconnect box, usually a gray metal box mounted on the wall near the condenser. Pull the disconnect block out, inspect it for a blown fuse or scorched contacts, and reseat it firmly.
- A single trip that resets cleanly and holds is usually a minor overload, often not a sign of a bigger problem.
- A breaker that trips again within a minute of resetting almost always points to a short or a failing component downstream.
- Corrosion, a burning smell, or melted plastic anywhere on the disconnect means stop and call a professional immediately.
- Never reset a breaker more than twice. If it won’t hold, you’re looking at an electrical fault, not a fluke.
InspectApedia’s diagnostic guidance is blunt about this: a breaker that keeps tripping after a proper reset indicates a downstream fault that needs professional diagnosis, not repeated resets. Repeated breaker resets are one of the more common ways homeowners accidentally damage a compressor that might otherwise have been a simple, inexpensive fix. If you’re dealing with this pattern regularly, our guide on AC tripping breaker issues walks through what’s usually behind it.
Filters, Frozen Coils, and Clogged Drains: The Airflow Culprits
A dirty filter doesn’t just reduce comfort. On many systems, it can trigger a safety shutdown that mimics a total failure. So can a clogged condensate line, which is one of the most commonly missed reasons for a system that suddenly stops running with no warning.
- Pull the filter and hold it up to light. If you can’t see light through it clearly, replace it. A filter that is overdue for replacement is often the culprit.
- Check the indoor coil for ice. If you see frost or ice buildup on the refrigerant lines or coil, the system has likely been struggling with restricted airflow for a while. Turn the system to “Off” (not just the fan) and let it thaw completely, which can take several hours, before restarting.
- Locate the drain pan under the indoor air handler. If there’s standing water, the condensate line is likely clogged.
- Find the float switch, usually a small sensor floating in or near the drain pan or PVC drain line. When it senses rising water, it cuts power to the system on purpose. This is a safety feature working correctly, not a malfunction.
- Clear the clog if you’re comfortable doing so. A wet/dry vac at the outdoor termination point of the PVC drain line can pull out algae and sludge that’s blocking flow.
Clearing that clog often brings the system right back online, since the float switch resets itself automatically once the water level drops. Bryant’s diagnostic guide lists condensate drain issues alongside thermostat and breaker checks as among the most common, and most fixable, causes of a no-start call.
Pro Tip: A cup of distilled vinegar poured into the drain line access point every few months keeps algae from building up in the first place. It’s a five-minute habit that prevents one of the most common summer service calls in Florida’s humidity.
What Humming, Clicking, or a Dead Fan Really Means
If your indoor thermostat, breaker, filter, and drain all check out fine but the outdoor unit still won’t start, the problem has moved into territory homeowners shouldn’t handle themselves. The symptoms below point to specific parts, and every one of them involves either high voltage or moving components that can cause injury.
- A loud hum with no fan movement usually points to a failed start capacitor, a component that gives the compressor and fan motor the initial jolt of energy they need to start spinning.
- Rapid clicking often means the contactor, an electrically controlled switch, is trying to engage but failing, sometimes due to pitted or burned contacts.
- The fan spins freely but the compressor stays silent can indicate a failed run capacitor or a compressor that’s seized internally.
- A fan that spins slowly or wobbles suggests a failing fan motor bearing, which will eventually stop entirely if ignored.
A run or start capacitor holds a substantial electrical charge, even after the unit is powered off. That stored charge is exactly why capacitor and contactor diagnosis is considered technician-only work, not a homeowner repair task.
A technician diagnosing these symptoms will use a multimeter to test the capacitor’s microfarad rating against its labeled value and check the contactor for continuity and pitting. Most capacitor and contactor failures are same-visit repairs; the part itself is inexpensive, but the labor and diagnostic time are where the cost lives. This is also the point in the diagnostic sequence where most “silent no-start” calls actually get resolved.
The Right Way to Reset Your System (and What Not to Do)
If you’ve checked the basics and want to try one more thing before calling for service, a clean power cycle is the safest option left.
- Turn the AC breaker fully off. Not just the thermostat, the breaker itself.
- Wait a full 30 minutes. This gives internal components, including any built-in compressor protection delays, time to fully reset.
- Turn the breaker back on and set the thermostat to “Cool.” Give the system up to 5 minutes to respond; some units have a deliberate restart delay built in specifically to protect the compressor.
That built-in delay trips up a lot of well-meaning homeowners. Forcing multiple quick restarts, or flipping the breaker on and off repeatedly to “hurry it along,” can burn out a compressor that a slower, patient restart would have spared. HomeFixer101’s guidance on this reset sequence lines up with what most manufacturers recommend before calling for a repair.
Two things to never do: don’t run your AC off a portable generator unless it’s explicitly rated for the compressor’s startup surge, and don’t attempt to install a “hard start” capacitor kit yourself. Both can cause damage that voids warranties or creates new electrical hazards.
When to Stop Troubleshooting and Call a Technician
Some symptoms simply aren’t DIY territory, no matter how confident you feel with a screwdriver.
- The breaker trips a second time after a proper reset.
- You smell anything burning, electrical or otherwise.
- You see oily residue or dark spots near refrigerant lines, a possible sign of a refrigerant leak.
- The outdoor fan motor is seized, hot to the touch, or won’t turn by hand when powered off.
- You hear a persistent hum that doesn’t resolve after a full power cycle.
A technician arriving on one of these calls will typically test the capacitor, contactor, and compressor windings with a multimeter, and check refrigerant pressures if the system runs but doesn’t cool. Because the diagnostic sequence is well established, most of these visits resolve in one appointment. Before you call, jot down what you already checked, when the problem started, and whether you heard any specific sounds. If you can, snap a photo of the breaker panel and the outdoor disconnect. Our page on what to check before your AC repair call covers exactly what details speed up a diagnosis.
Preventing the Next No-Start Call
Most “AC won’t turn on” emergencies trace back to something predictable, and predictable problems are the ones you can plan around.
- Replace filters every 30 to 90 days depending on your home and pets.
- Keep at least 2 feet of clearance around the outdoor unit, clear of leaves, mulch, and shrubs.
- Flush the condensate drain line quarterly, especially during Florida’s humid months.
- Schedule an annual tune-up that includes capacitor testing, electrical connection tightening, and coil cleaning.
- For rental properties or multiple units, build a quarterly walk-through into your property management calendar rather than waiting for tenant complaints.
A preventative maintenance agreement catches aging capacitors and loose electrical connections before they turn into a no-cooling emergency during a heat wave, when demand on every component is highest and failures cluster. Property managers juggling several units benefit most from a fixed seasonal schedule; our HVAC maintenance checklist breaks that schedule down month by month.
Pro Tip: Set a recurring phone reminder for filter changes tied to a fixed date, like the first of the month, rather than “whenever it looks dirty.” Visual inspection alone leads most homeowners to wait too long.
Inspecting the Blower Motor and Fan
If the outdoor condenser fires up fine but you’re not feeling any air from your vents, the problem has likely shifted indoors to the blower motor, the component that pushes conditioned air through your ductwork.
Start by listening at the indoor air handler or furnace closet. A blower that hums but doesn’t spin often has a failed capacitor of its own, separate from the outdoor unit’s capacitor, or a jammed bearing. A blower that runs but sounds like it’s straining, grinding, or rattling usually points to a failing motor bearing or a wheel that’s come loose from the shaft.
Visually inspect the blower wheel if you can access it safely with the power off. Dust and debris buildup on the fins reduces airflow significantly and can make a healthy motor sound like it’s failing under load. This is also worth checking if your energy bills have crept up gradually. A struggling blower motor draws more power to move the same amount of air.
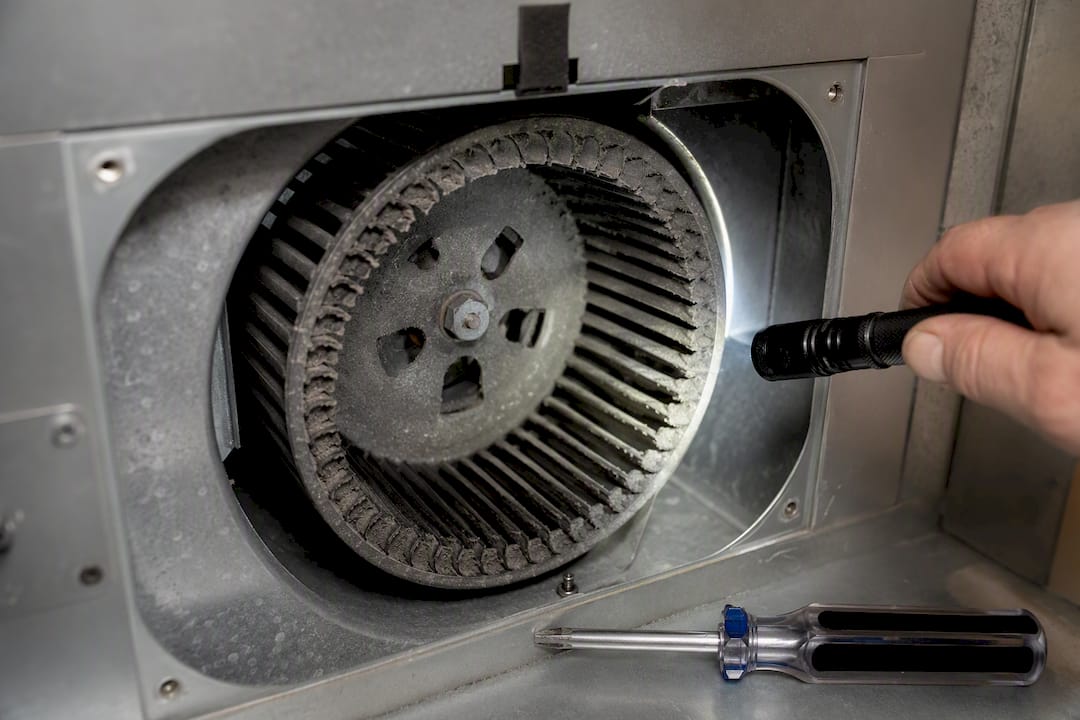
Blower motor issues are trickier to self-diagnose than outdoor unit problems because symptoms overlap with ductwork issues, a failing capacitor, and even thermostat fan settings. If you’ve confirmed the thermostat fan setting is correct and you still hear the blower struggling or not running at all, that’s a job for a technician with amp-draw testing tools, not a visual inspection alone.
Could a Sensor Be Blocking Startup?
Modern HVAC systems rely on several small sensors to decide whether it’s safe to run, and any one of them can quietly block startup without an obvious symptom like a tripped breaker.
The condensate float switch covered earlier is technically a sensor, and it’s the one homeowners encounter most often. But there are others. A freeze sensor mounted near the indoor coil will shut the system down if it detects ice forming, which protects the compressor but can leave you thinking the whole unit died. High and low pressure switches on the refrigerant lines will prevent compressor startup if pressures fall outside safe operating ranges, often a sign of a refrigerant leak or a restriction somewhere in the system.
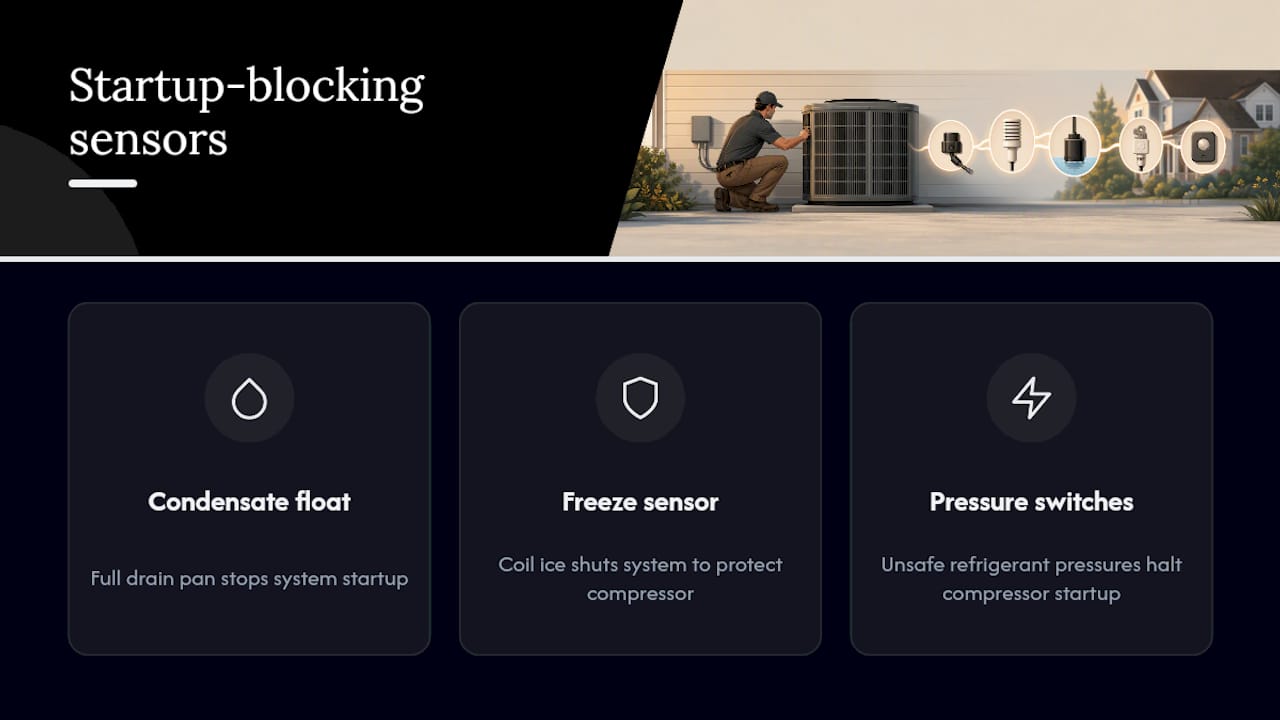
None of these sensors are things a homeowner should bypass or disable, even temporarily. They exist specifically to prevent expensive compressor damage, and a system that won’t start because of a tripped sensor is doing exactly what it’s designed to do. The fix isn’t to override the sensor. It’s to correct whatever condition triggered it, whether that’s a frozen coil, a full drain pan, or low refrigerant.
If you’ve ruled out the float switch and frozen coil issues covered earlier and the system still won’t start, a pressure switch or control board fault is the next likely explanation. Diagnosing which sensor tripped requires a technician with access to the control board’s fault codes, which usually display as a blinking light sequence readable only with the equipment’s service manual in hand.
Technician Perspective: What We See on Most No-Start Calls
Most no-start service calls break down into three buckets: a tripped breaker or blown fuse, a dead capacitor, or a clogged condensate line triggering the float switch. Rarely is it something exotic. The single habit that prevents the majority of these calls is dead simple: change the filter on a fixed schedule and get an annual tune-up before peak season hits. A five-minute filter swap in April is a lot cheaper than a compressor replacement in August.
— Results
Book a Diagnostic With Lucas Air and Skip the Guesswork
If you’ve worked through the checks above and you’re still staring at a silent outdoor unit, or you heard that telltale hum and stopped right where you should have, it’s time to bring in a technician. A professional HVAC service provider handles no-start calls with a diagnostic visit built around this sequence: power and control checks first, then airflow and drainage, then the outdoor electrical components that require real tools and training to test safely.

A typical visit includes multimeter testing on the capacitor and contactor, a check of refrigerant pressures if the system runs but doesn’t cool, and a straightforward explanation of what failed and what it costs to fix before any work begins. Most capacitor, contactor, and drain-related repairs finish in a single visit. If your system is older or this isn’t the first no-start call you’ve made this year, ask about our tune-up service or financing options when you book, since a full system evaluation now often costs less than another emergency call later. You can schedule a repair visit directly through our site whenever you’re ready.
Sources
- AC Unit Not Turning On? Troubleshooting steps | Carrier
- Air Conditioner Won’t Start: Diagnostic sequence | InspectApedia
- AC not turning on — causes and fixes | Bryant
- Why Is My AC Not Turning On (5 Things to Check Before Calling a Pro) | HomeFixer101
