Living in Central Florida means relying on your air conditioner nearly year round, but many homeowners struggle to know when their system needs attention. Without a clear assessment process, you risk sudden breakdowns during peak summer heat, skyrocketing energy bills, and expensive emergency repairs. This guide walks you through a systematic approach to evaluating your AC’s condition, helping you catch problems early and make informed decisions about maintenance or replacement. You’ll learn exactly what to check, which tools you need, and when to call in professional help.
Table of Contents
- Key takeaways
- Preparing for your AC assessment
- Step-by-step air conditioner assessment process
- Troubleshooting common air conditioner issues during assessment
- Verifying results and planning maintenance or repair
- Professional HVAC services for your Central Florida home
- Frequently asked questions
Key Takeaways
| Point | Details |
|---|---|
| Preparation and safety | Gather essential tools, review safety procedures, and power down the system at the thermostat and circuit breaker before inspections to prevent injuries. |
| Tools for inspection | Prepare a toolbox including a screwdriver set, flashlight, digital thermometer, a multimeter if you are comfortable, a mirror on an extension handle, and coil cleaner plus cleaning supplies for debris removal. |
| Know when to call | Do not attempt refrigerant checks yourself and contact a professional for refrigerant work and other complex electrical issues. |
| Structured assessment steps | Follow a structured sequence from inspecting the air filter to checking the thermostat to build a complete view of the system. |
| Seasonal timing tips | Schedule the assessment in spring or fall to stay comfortable and avoid peak heat while repairs are completed. |
Preparing for your AC assessment
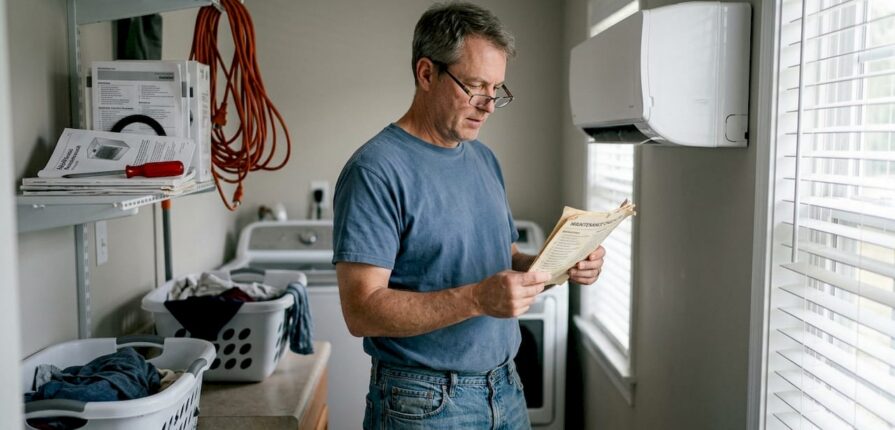
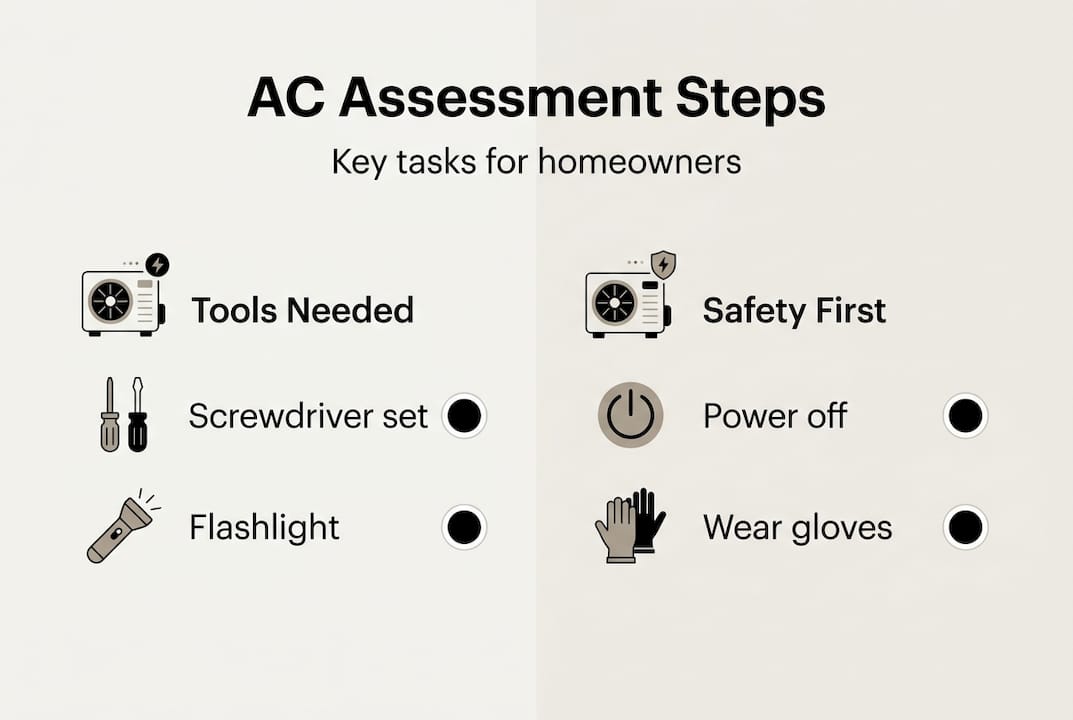
Before you start examining your air conditioning system, gathering the right tools and understanding basic safety protocols makes the difference between a productive inspection and a frustrating experience. Proper preparation ensures you can complete a thorough assessment without missing critical components or putting yourself at risk.
You’ll need several essential tools for a comprehensive evaluation. A standard screwdriver set helps access panels and components, while a flashlight illuminates dark spaces inside your unit. A digital thermometer measures temperature differentials, and if you’re comfortable with more advanced checks, a multimeter tests electrical connections. For visual inspections, a small mirror on an extension handle lets you see behind tight spaces. Keep cleaning supplies handy, including a soft brush and coil cleaner for removing debris.
Safety must come first when working with HVAC equipment. Always turn off power to your air conditioner at both the thermostat and the circuit breaker before touching any components. Electrical shocks from AC units can be severe or fatal. Wear protective gloves when handling metal parts with sharp edges, and safety glasses protect your eyes from dust and debris. Never attempt to check refrigerant levels yourself, as handling refrigerants requires EPA certification and specialized equipment. Moving fan blades can cause serious injury, so verify the power is completely off before reaching near them.
Understanding your AC’s basic components helps you know what you’re looking at during inspection. The outdoor condenser unit contains the compressor, condenser coil, and fan. Inside your home, the evaporator coil sits in the air handler or furnace, while the air filter protects this coil from dust. The thermostat controls when your system runs, and refrigerant lines connect indoor and outdoor components. Familiarizing yourself with these parts through your owner’s manual gives context for each inspection step.
| Tool/Material | Purpose | Safety consideration |
|---|---|---|
| Screwdriver set | Access panels and components | Ensure power is off before use |
| Digital thermometer | Measure temperature differential | None, safe for homeowner use |
| Flashlight | Illuminate dark areas | Check for moisture before use |
| Multimeter | Test electrical connections | Requires basic electrical knowledge |
| Coil cleaner | Remove debris from coils | Follow product safety instructions |
| Protective gloves | Handle sharp metal edges | Use insulated gloves near electrical |
Pro Tip: Schedule your assessment during mild weather in spring or fall. You’ll be more comfortable working outside, and if you discover a problem, you won’t be without cooling during extreme heat while waiting for repairs.
Your home HVAC maintenance routine becomes more effective when you understand what to look for. Check your owner’s manual for model specific maintenance recommendations, as some systems have unique requirements or access points. Taking photos during your first assessment creates a reference point for future inspections, helping you spot changes over time.
Step-by-step air conditioner assessment process
Once you’ve gathered your tools and reviewed safety procedures, you’re ready to conduct a methodical evaluation of your system. Following these steps in order ensures you don’t miss critical areas and helps you build a complete picture of your AC’s condition.
-
Start with the air filter. Turn off your system and locate the filter, typically found in the return air duct or air handler. Remove it and hold it up to light. If you can’t see light passing through easily, the filter needs replacement. A clogged filter restricts airflow, forcing your system to work harder and reducing efficiency by up to 15%. Replace disposable filters or clean reusable ones according to manufacturer guidelines.
-
Examine the thermostat. Check that your thermostat displays accurately and responds to temperature changes. Set it a few degrees below current room temperature and listen for your system to start. If there’s a delay or no response, you may have calibration issues or dead batteries. Test both cooling and fan settings to verify all functions work properly.
-
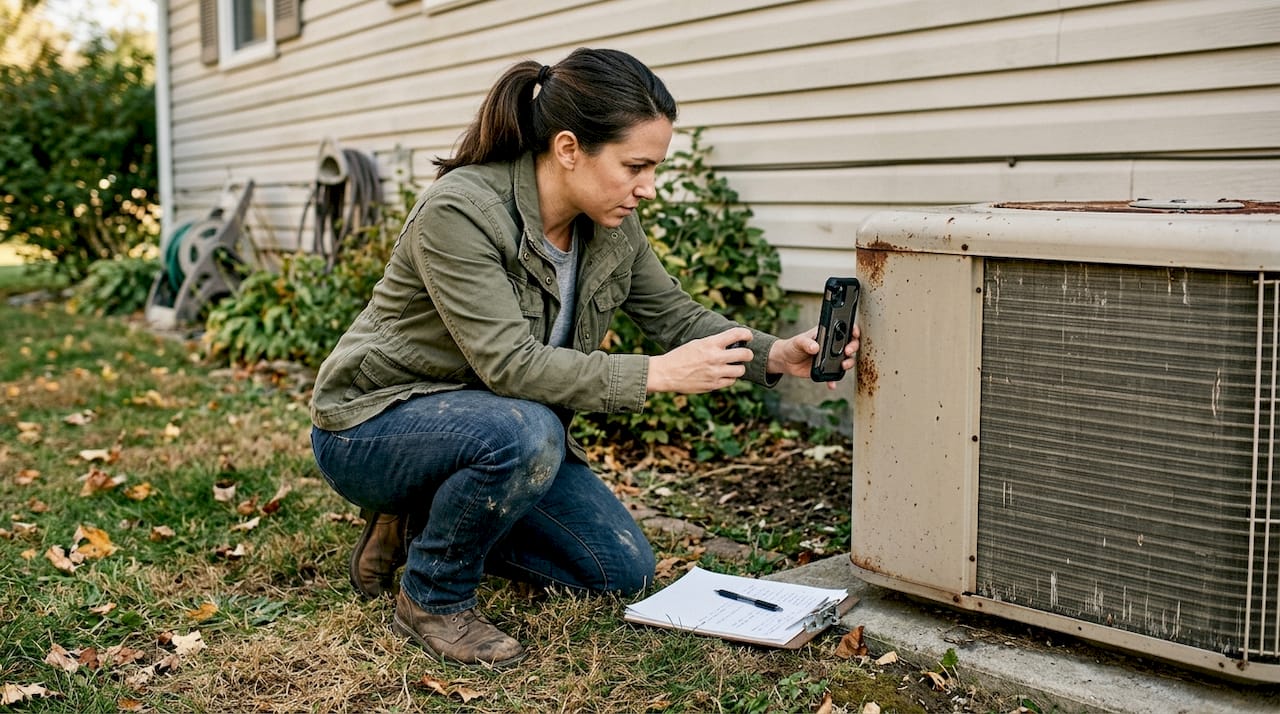
Inspect the outdoor condenser unit. Clear debris like leaves, grass clippings, and dirt from around the unit, maintaining at least two feet of clearance on all sides. Remove the top grille and check inside for debris accumulation. Look at the condenser coils for bent fins or buildup, both of which restrict airflow. Gently straighten bent fins with a fin comb if you have one available.
-
Check the evaporator coil. Access the indoor evaporator coil through the air handler panel. Look for dust buildup, ice formation, or signs of mold. Ice on the coil indicates restricted airflow or low refrigerant. Dust and debris reduce heat transfer efficiency. If you see significant buildup, professional cleaning may be necessary.
-
Assess refrigerant lines. Examine the copper lines running between your indoor and outdoor units. Look for oil stains or residue, which indicate refrigerant leaks. Check that insulation on the lines remains intact, as damaged insulation reduces efficiency. Never attempt to check refrigerant levels yourself, as this requires specialized gauges and certification.
-
Test electrical connections. With power still off, visually inspect visible wiring for fraying, corrosion, or loose connections. Look at the capacitor, a cylindrical component in the outdoor unit, for bulging or leaking, which signals failure. Tighten any loose electrical terminal screws if you’re comfortable doing so, but if you see significant corrosion or damage, call a professional.
-
Measure airflow and temperature. Turn your system back on and let it run for 15 minutes. Place your thermometer in a supply vent and record the temperature. Then measure the temperature at a return vent. The difference should be 15 to 20 degrees. A smaller difference suggests your system isn’t cooling effectively, possibly due to low refrigerant or airflow problems.
Pro Tip: Take notes and photos during each step. Documenting your findings helps you track changes over time and provides valuable information if you need to discuss issues with a technician. Date your records so you can see how quickly problems develop.
This systematic inspection approach gives you a comprehensive view of your system’s health. Pay attention to unusual sounds during operation, like grinding, squealing, or banging, as these often indicate mechanical problems requiring immediate attention. Similarly, unusual odors like burning smells or musty scents point to electrical issues or mold growth.
Troubleshooting common air conditioner issues during assessment
As you work through your inspection, you’ll likely encounter some common problems. Recognizing these issues and knowing which ones you can address yourself versus which require professional expertise saves you time and prevents potentially dangerous situations.
Refrigerant leaks rank among the most serious AC problems. Signs include ice buildup on refrigerant lines or the evaporator coil, reduced cooling capacity, and hissing sounds near the outdoor unit. Oil stains on refrigerant lines also indicate leaks. Never attempt to repair refrigerant leaks yourself. Refrigerants require EPA certified technicians to handle safely and legally. If you suspect a leak, shut down your system and call a professional immediately to prevent compressor damage.
Clogged or dirty filters cause multiple performance issues. You’ll notice reduced airflow from vents, longer cooling cycles, and increased energy bills. The solution is straightforward: replace disposable filters monthly during heavy use periods, or clean reusable filters according to manufacturer instructions. In Central Florida’s dusty conditions, you may need more frequent changes than the standard recommendation.
Faulty thermostats create frustrating temperature inconsistencies. Your home might feel too warm despite the system running, or the AC might short cycle, turning on and off rapidly. First, replace batteries if your thermostat uses them. Check that the thermostat isn’t in direct sunlight or near heat sources, which skew readings. Verify settings haven’t accidentally changed. If problems persist after these checks, thermostat replacement or recalibration by a technician may be necessary.
Safety Warning: Never attempt to repair electrical components, handle refrigerants, or work on your AC system with power connected. Electrical shock can be fatal, and improper refrigerant handling violates federal law and can cause serious health effects. When in doubt, always contact a licensed HVAC professional.
Electrical failures manifest in various ways. A system that won’t start might have a tripped breaker, blown fuse, or failed capacitor. Check your electrical panel first for tripped breakers. If resetting the breaker doesn’t solve the problem, or if it trips again immediately, you have a more serious electrical issue requiring professional diagnosis. Capacitor failure is common in Florida’s heat, but replacement requires technical knowledge and safety precautions.
Unusual noises during operation signal specific problems:
- Grinding or squealing suggests worn motor bearings needing lubrication or replacement
- Banging or clanking indicates loose or broken internal components
- Hissing points to refrigerant leaks or valve issues
- Clicking that doesn’t stop suggests electrical control problems
- Bubbling sounds in refrigerant lines indicate air in the system
Most noise issues require professional HVAC repair to diagnose and fix safely. Continuing to run a system making unusual sounds often leads to more extensive damage and higher repair costs. Understanding when DIY efforts are appropriate versus when professional intervention is necessary protects both your safety and your investment. Simple tasks like filter changes, debris removal, and basic cleaning fall within homeowner capabilities. Anything involving refrigerant, electrical repairs beyond tightening connections, or internal component replacement requires licensed technicians. Consider installing an air quality sensor to monitor your indoor environment and catch ventilation problems early.
Verifying results and planning maintenance or repair
After completing your assessment, you need to interpret your findings and decide on appropriate next steps. The information you’ve gathered determines whether your system needs routine maintenance, immediate repair, or full replacement.
Review all your notes and photos from the inspection. Look for patterns in your findings. A single minor issue like a dirty filter is routine maintenance. Multiple problems like refrigerant leaks, electrical failures, and worn components suggest more serious concerns. Consider your system’s age alongside current issues. AC units typically last 15 to 20 years in Central Florida’s climate, but constant use accelerates wear.
| Situation | Signs present | Recommended action | Expected benefit |
|---|---|---|---|
| Routine maintenance needed | Dirty filter, minor debris, good performance | Clean, replace filter, schedule tune up | Maintains efficiency, prevents issues |
| Repair required | One major issue, system under 10 years old | Professional repair of specific component | Restores function, extends lifespan |
| Replacement consideration | Multiple failures, system over 15 years, frequent repairs | Evaluate repair cost vs new system | Long term savings, improved efficiency |
When deciding between repair and replacement, calculate the cost of repairs against your system’s remaining lifespan. A common rule suggests if repair costs exceed 50% of a new system’s price and your unit is over 10 years old, replacement makes more financial sense. Factor in energy efficiency improvements too. New systems can be 40% more efficient than older models, offsetting replacement costs through lower utility bills.
Schedule professional inspections annually, even if your DIY assessment finds no problems. Technicians have specialized tools and training to catch issues you might miss:
- Precise refrigerant level measurement and adjustment
- Electrical component testing with specialized meters
- Ductwork inspection for leaks and damage
- System performance optimization and calibration
- Early detection of wear before failures occur
Pro Tip: Keep a detailed maintenance log documenting every inspection, repair, and filter change. Note dates, findings, and actions taken. This record helps you track recurring issues, proves maintenance history if you sell your home, and provides valuable information to technicians diagnosing problems.
Consider enrolling in a preventative maintenance agreement with a local HVAC company. These programs typically include biannual inspections, priority service, and discounts on repairs. Regular professional maintenance catches small problems before they become expensive failures and keeps your warranty valid, as most manufacturers require documented annual service.
If your assessment revealed issues requiring professional attention, don’t delay scheduling HVAC repairs. Small problems like refrigerant leaks or electrical issues worsen rapidly, especially under the constant load of Florida summers. What starts as a minor repair can quickly become a complete system failure if ignored. Acting promptly based on your assessment findings protects your comfort and your budget.
Professional HVAC services for your Central Florida home
While DIY assessments help you stay informed about your system’s condition, partnering with experienced professionals ensures optimal performance and longevity. Lucas Air Conditioning and Heating brings specialized expertise to every aspect of AC care, from routine maintenance to complex repairs and new installations.
Our technicians understand the unique challenges Central Florida’s climate presents for air conditioning systems. Constant humidity, salt air in coastal areas, and year round operation create conditions that accelerate wear and require specialized knowledge to address effectively. Whether you’re in The Villages, Tavares, or surrounding communities, we provide comprehensive HVAC services tailored to local conditions. From thorough inspections that go beyond what homeowners can safely perform to emergency repairs and energy efficient system upgrades, professional support helps you avoid costly breakdowns and maintain comfortable indoor temperatures efficiently. Our veteran owned company prioritizes customer service and transparent communication, helping you make informed decisions about your home comfort systems.
Frequently asked questions
How often should I perform an air conditioner assessment?
Conduct a basic visual assessment monthly, checking filters and clearing debris from your outdoor unit. Perform a comprehensive inspection following the steps in this guide at least twice yearly, ideally in spring before cooling season and fall after heavy summer use. If you notice performance changes like reduced cooling, unusual noises, or higher energy bills, assess your system immediately regardless of your regular schedule.
Can I perform the entire AC assessment myself safely?
You can safely complete visual inspections, filter changes, debris removal, and basic airflow measurements. However, tasks involving refrigerant, electrical component testing beyond visual inspection, and internal mechanical work require professional expertise and specialized equipment. Attempting these without proper training risks personal injury, equipment damage, and legal violations. Focus your DIY efforts on observation and maintenance tasks, leaving technical diagnostics and repairs to licensed technicians.
What are the signs my air conditioner needs repair versus replacement?
Repair makes sense when you have a single component failure, your system is under 10 years old, and repair costs are reasonable relative to the unit’s value. Consider replacement when your AC is over 15 years old, requires frequent repairs, uses outdated refrigerant, or when repair costs exceed half the price of a new system. Multiple simultaneous failures, significantly reduced efficiency, and inability to maintain comfortable temperatures despite repairs also indicate replacement time.
How can I improve my AC’s energy efficiency after assessment?
Change filters monthly, seal duct leaks, and ensure proper insulation around refrigerant lines. Set your thermostat to 78 degrees when home and higher when away, using a programmable model to automate adjustments. Keep your outdoor unit clear of debris and shaded if possible. Schedule annual professional maintenance to keep components clean and operating at peak efficiency. If your system is over 10 years old, upgrading to a newer model can reduce energy consumption by 40% or more, providing substantial long term savings despite the initial investment.
